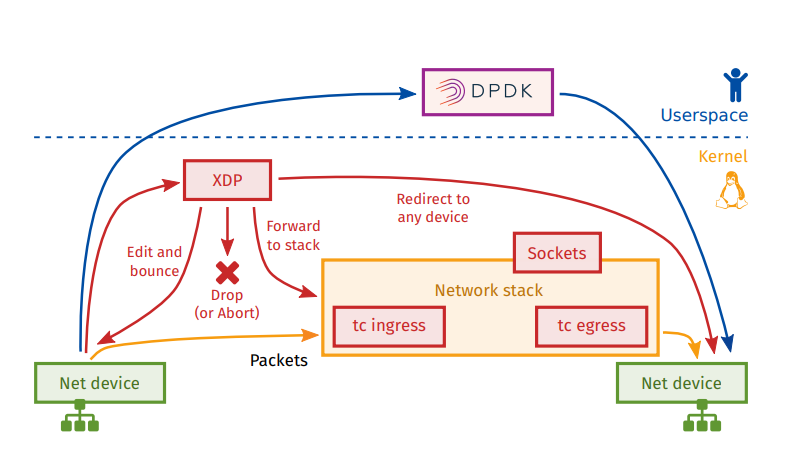
Tuesday, December 14, 2021

KPATCH - live patch load/unloading in running kernel

Prerequisite
=============
apt-get install gcc-7-plugin-dev
yum install python2-devl
yum install python3-devel
yum install yum-utils
Install kpatch
================
git clone https://github.com/dynup/kpatch.git
cd kpatch
source test/integration/lib.sh
kpatch_dependencies
make -j
make install

Run kpatch on kernel src with patch to be applied
==================================================
1.build kernel from source
2.kpatch-build -j20 nvme.patch -s <kernel_src> -c <kernel_src/.config>

This will create kpatch-nvme.ko 

Installing module
==================
kpatch install kpatch-nvme.ko
kpatch list

Loading/unloading kpatch module.
=============================
kpatch load kpatch-nvme.ko
kpatch unload kpatch-nvme.ko

to check build  logs- > tail -f /root/.kpatch/build.log
Good Read -> https://blog.kernelcare.com/live-patching-debian-10-linux-kernel-with-kpatch

Wednesday, July 28, 2021

Pyverbs - RDMA with Python


Skip to end of metadata

>>Install following packaes prerequiste for pyverbs compilation in rdma-core

rpm -ivh http://mirror.centos.org/centos/8/PowerTools/x86_64/os/Packages/python3-Cython-0.28.1-3.el8.x86_64.rpm
yum install python3-devel
yum install libudev-devel
yum install pkgconfig valgrind-devel libudev-devel cmake libnl3-devel python3-devel python3-docutils

>>with above package installed , now build rdma-core

./build.sh → with above packages will compile pyvers in rdma-core

>>run sample application present in rdma-core using
PYTHONPATH='/opt/rdma-core/build/python' python3 pyverbs/examples/ib_devices.py


Good resources

https://github.com/linux-rdma/rdma-core/blob/master/Documentation/pyverbs.md

https://webcache.googleusercontent.com/search?q=cache:ichFGVm_EvkJ:https://bugzilla.redhat.com/show_bug.cgi%3Fid%3D1894516+&cd=2&hl=en&ct=clnk&gl=in

Server and DRAC Identification via SNMP

 Sometimes Network IP Changes creates a problem in identifying DRAC Ip or Server IP , with SNMP agent Enable on DRAC and Server


we can use Advance IP Scanner to Quickly Scan network range and with Name appear we can easily get the IP.


Setting Name FOR DRAC

Enable SNMP and Change DNS name


FastLinQ Documentation > Server and DRAC Identification via SNMP > image2021-2-19_22-58-46.png


FastLinQ Documentation > Server and DRAC Identification via SNMP > image2021-2-19_22-55-11.png


Assign DNS IDRAC and enable SNMP Agent


Setting Name on Servers

RHEL/CENTOS

Installation

Execute the command:

yum install -y net-snmp

Add the line below to the configuration file (/etc/snmp/snmpd.conf):

rocommunity public

agentAddress udp:161,udp6:[::1]:161

Start the snmpd service:

systemctl enable snmpd && systemctl start snmpd

Allowing SNMP ports in firewall

Execute the following commands:


firewall-cmd --zone=public --add-port=161/udp --permanent

firewall-cmd --zone=public --add-port=162/udp --permanent

firewall-cmd --reload


CentOS

Installation

Execute the commands:


> yum update

> yum install net-snmp


Configuration

Edit the file: /etc/snmp/snmpd.conf 


Add the line:

rocommunity public

Replace the line below:

view systemview included .1.3.6.1.2.1.25.1.1

with the following line:

view systemview included .1.3.

Restart the SNMP Service:

service snmpd restart

Allowing SNMP ports in Firewall

Execute the commands:


firewall-cmd --zone=public --add-port=161/udp --permanent

firewall-cmd --zone=public --add-port=162/udp --permanent

firewall-cmd --reload


Ubuntu

Installation

Execute the command:


> apt update

> apt install snmpd


Configuration

Edit the file: /etc/snmp/snmpd.conf 


Add the line:

rocommunity public

Comment the line:

#agentAddress udp:127.0.0.1:161

Uncomment the line: 

agentAddress udp:161,udp6:[::1]:161

Restart the SNMP Service:

service snmpd restart

Allowing SNMP ports in firewall

Execute the following commands to allow necessary ports:


ufw allow 161/udp

ufw allow 162/udp


Using Advance IP Scanner  To Scan network 


Now Running IP Scanner will Show the Name of the Server and DRAC


FastLinQ Documentation > Server and DRAC Identification via SNMP > image2021-2-19_23-6-14.png


https://www.site24x7.com/help/admin/adding-a-monitor/configuring-snmp-linux.html


Friday, October 9, 2020

Binding VF to VFIO inside QEMU


Bnding the VF to vfio-pci in the guest VM , there are two option

1.   Enabling vIOMMU inside QEMU/VM

2.   Using no-iommu mode of VFIO drivers


NO_IOMMU_MODE 

On Guest VM

 1.modprobe vfio-pci

2.echo 1 > /sys/module/vfio/parameters/enable_unsafe_noiommu_mode

3. usertools/dpdk-devbind.py -b vfio-pci 07:00.0


VIOMMU MODE


On HOST Machine

================

1.load modules

   modprobe qede

  modprobe vfio-pci


2. Check PF B:D:F ( bus:device:function)

   #lspci | grep QL

  04:00.0 Ethernet controller: QLogic Corp. FastLinQ QL41000 Series 10/25/40/50GbE Controller (rev 02)

  04:00.1 Ethernet controller: QLogic Corp. FastLinQ QL41000 Series 10/25/40/50GbE Controller (rev 02)


3.Create VF on a PF

echo 1 > /sys/devices/pci0000:00/0000:00:03.0/0000:04:00.1/sriov_numvfs


4. Unbind the qede driver from VF so that it can imported to VM.

  echo -n "0000:04:0e.0" > /sys/bus/pci/drivers/qede/unbind


5.Get Vendor ID of VF device

  # lspci -nn | grep QL | grep IOV

  04:0e.0 Ethernet controller [0200]: QLogic Corp. FastLinQ QL41000 Series Gigabit Ethernet Controller (SR-IOV VF) [1077:8090] (rev 0

  * Value in square Bracket


5.Bind the device to the vfio-pci driver

  sudo echo "1077 8090" > /sys/bus/pci/drivers/vfio-pci/new_id


6.Start QEMU with Quest VM.

  /usr/bin/qemu-system-x86_64  -machine q35,kernel-irqchip=split,accel=kvm -smp 4 -m 2G \

  -device intel-iommu,intremap=on,caching-mode=on -nographic /home/fastlinq/centos-7.8.qcow2 \

  -device vfio-pci,host=04:0e.0


Guest VM

=======

1.edit  /etc/default/grub

and add these "iommu=pt intel_iommu=on"  at end of GRUB_CMDLINE_LINUX


e.g

GRUB_CMDLINE_LINUX="console=tty0 rd_NO_PLYMOUTH crashkernel=auto resume=UUID=40ff

14688-2619-4046-a9eb-b7333fff1b84 console=ttyS0,115200 iommu=pt intel_iommu=on"


2.update the grub using

a)grub2-mkconfig -o /boot/grub2/grub.cfg (For Redhat/Centos)

b) update-grub (For Ubuntu)


3.reboot


4.Check BDF for VF inside VM

# lspci | grep QL

00:03.0 Ethernet controller: QLogic Corp. FastLinQ QL41000 Series Gigabit Ethernet Controller (SR-IOV VF) (rev 02)


5. modprobe vfio-pci


6.Bind the VF to VFIO using below

  usertools/dpdk-devbind.py -b vfio-pci 00:03.0


7.Check status


[root@centos-8 dpdk-stable-19.11.5]#  usertools/dpdk-devbind.py --status-dev net

Network devices using DPDK-compatible driver

============================================

0000:00:03.0 'FastLinQ QL41000 Series Gigabit Ethernet Controller (SR-IOV VF) 8090' drv=vfio-pci unused=qede


Network devices using kernel driver

===================================

0000:00:02.0 '82574L Gigabit Network Connection 10d3' if=enp0s2 drv=e1000e unused=vfio-pci *Active*

Saturday, October 3, 2020

XDP - Getting Started with XDP (Linux)


XDP


Introduced in Linux 4.8 eBPF hook at the driver level (ingress)

Intercept packet before it reaches the stack, before allocating sk_buff

Rationale: implement a faster data path which is part of the kernel, maintained by the kernel community Rather for simple use cases.

Complex processing: forward to stack Not a “kernel bypass”, works in cooperation with the networking stack


Essentially, user-space networking achieves high-speed performance by moving packet-processing out of the kernel’s realm into user-space

XDP does in fact the opposite: it moves user-space networking programs (filters, mappers, routing, etc) into the kernel’s realm. 

XDP allows us to execute our network function as soon as a packet hits the NIC, and before it starts moving upwards into the 

kernel’s networking layer, which results into a significant increase of packet-processing speed

Accelerating-VM-Networking-through-XDP_Jason-Wang.pdf

https://help.netronome.com/support/solutions/articles/36000050009-agilio-ebpf-2-0-6-extended-berkeley-packet-filter

https://www.netronome.com/blog/hello-xdp_drop/

https://archive.fosdem.org/2018/schedule/event/xdp/attachments/slides/2220/export/events/attachments/xdp/slides/2220/fosdem18_SdN_NFV_qmonnet_XDPoffload.pdf


XDP MODES

In total, XDP supports three operation modes which iproute2 implements as well: xdpdrv, xdpoffload and xdpgeneric.

xdpdrv stands for native XDP, meaning the BPF program is run directly in the driver’s receive path at the earliest possible point in software.
This is the normal / conventional XDP mode and requires driver’s to implement XDP support, which all major 10G/40G/+ networking drivers
in the upstream Linux kernel already provide.

xdpgeneric stands for generic XDP and is intended as an experimental test bed for drivers which do not yet support native XDP.
Given the generic XDP hook in the ingress path comes at a much later point in time when the packet already enters the stack’s
main receive path as a skb, the performance is significantly less than with processing in xdpdrv mode.
xdpgeneric therefore is for the most part only interesting for experimenting, less for production environments.

xdpoffload Last but not least, thIs mode is implemented by SmartNICs such as those supported by Netronome’s nfp driver and
allow for offloading the entire BPF/XDP program into hardware, thus the program is run on each packet reception directly
on the card. This provides even higher performance than running in native XDP although not all BPF map types or BPF helper
functions are available for use compared to native XDP. The BPF verifier will reject the program in such case and report
to the user what is unsupported. Other than staying in the realm of supported BPF features and helper functions,
no special precautions have to be taken when writing BPF C programs.


#include <linux/bpf.h>
int main()
{
return XDP_DROP;
}


clang -target bpf -O2 -c xdp.c -o xdp.o


ip -force link set dev ens1f0 xdpdrv obj xdp.o sec .text


ip link show ens1f0
32: ens1f0: <BROADCAST,MULTICAST,UP,LOWER_UP> mtu 1500 xdp qdisc mq state UP mode DEFAULT group default qlen 1000
link/ether f4:e9:d4:ed:25:38 brd ff:ff:ff:ff:ff:ff
prog/xdp id 36


0 XDP_ABORTED - Error, Block the packet
1 XDP_DROP - Block the packet
2 XDP_PASS - Allow the packet to continue up the kernel
3 XDP_TX - Bounce the packet back in the direction it came from


$ hping3 [IP Address of Host]
Traffic can be monitored using tcpdump, however it will show that no packets are received.
This is due to XDP dropping packets at the start of the kernel path, before the packets can reach tcpdump

unload xdp
ip link set dev [DEV] xdpdrv off


H/w offload load
ip -force link set dev ens1f0 xdpoffload obj xdp.o sec .text


Testing XDP


Steps 

Description  


Step 1

Check "clang" is installed or not else install it by yum install clang and XDP only supports on RHEL8 and above kernel 


Step 2

Create xdp_drop.c file in "/usr/src/kernels/$(uname -r)/net/xdp" directory 

touch /usr/src/kernels/$(uname -r)/net/xdp/xdp_drop.c


Step 3 

Write xdp_drop code inside xdp_drop.c file


#include <linux/bpf.h>

 #ifndef __section

 # define __section(NAME)                  \

    __attribute__((section(NAME), used))

 #endif


 __section("prog")

 int xdp_drop(struct xdp_md *ctx)

 {

     return XDP_DROP;

 }

 char __license[] __section("license") = "GPL";


Step 4 

Compile this code with below command so that it will create obj file

clang -O2 -Wall -target bpf -c xdp_drop.c -o xdp_drop.o


Step 5

Insert/Probe xdp_drop.o file to both interface (PF) with below command

ip link set dev ens3f0 xdp obj xdp_drop.o

ip link set dev ens3f1 xdp obj xdp_drop.o


Step 6

With  "ip link show"  command  check xdp loaded with some id.


[root@Gen9-XDP-Host-RHEL8 xdp]# ip link show

4: ens3f0: <BROADCAST,MULTICAST,UP,LOWER_UP> mtu 1500 xdp qdisc mq state UP mode DEFAULT group default qlen 1000

     link/ether 00:0e:1e:d6:62:fc brd ff:ff:ff:ff:ff:ff

     prog/xdp id 1 tag f95672269956c10d jited

 5: ens3f1: <BROADCAST,MULTICAST,UP,LOWER_UP> mtu 1500 xdp qdisc mq state UP mode DEFAULT group default qlen 1000

     link/ether 00:0e:1e:d6:62:fd brd ff:ff:ff:ff:ff:ff

     prog/xdp id 2 tag f95672269956c10d jited


Step 7

Send Traffic through scapy tool from Peer system to both the interface simultaneously 


sendp (Ether(src="00:0e:1e:d6:62:fc",dst="14:02:ec:d3:af:0a")/IP(src="44.44.44.1",dst="55.55.55.1")/TCP(sport=0xbbbb,dport=0xaaaa)/("x"*200), iface="ens3f0",count=1000000)

sendp (Ether(src="00:0e:1e:d6:62:fd",dst="14:02:ec:d3:af:0b")/IP(src="44.44.44.1",dst="55.55.55.1")/TCP(sport=0xbbbb,dport=0xaaaa)/("x"*200), iface="ens3f1",count=1000000)


1. Observed that packets were being dropped and “xdp_no_pass” counters were increasing, No packets were seen in tcpdump that suggest that Xpress data path was being used


[root@Gen9-XDP-Host-RHEL8 xdp]# ethtool -S ens3f0 | grep xdp

      0: xdp_no_pass: 5000

      1: xdp_no_pass: 3731

      2: xdp_no_pass: 5000

      3: xdp_no_pass: 4000

      4: xdp_no_pass: 4609

      5: xdp_no_pass: 5000

      6: xdp_no_pass: 4000

      7: xdp_no_pass: 5000


2. You should not see any unexpected failures in dmesg or /var/log/messages

 3. Should not see any driver/FW failure messages or system hang. 


Loading IN NATIVE MODE

# ip -force link set dev em1 xdpdrv obj prog.o
# ip link show
[...]
6: em1: <BROADCAST,MULTICAST,UP,LOWER_UP> mtu 1500 xdp qdisc mq state UP mode DORMANT group default qlen 1000
link/ether be:08:4d:b6:85:65 brd ff:ff:ff:ff:ff:ff
prog/xdp id 1 tag 57cd311f2e27366b
[...]
# ip link set dev em1 xdpdrv off

The option verb can be appended for loading programs in order to dump the verifier log,
# ip -force link set dev em1 xdpdrv obj prog.o verb

LOADING IN GENERIC MODE

# ip -force link set dev em1 xdpgeneric obj prog.o
# ip link show
[...]
6: em1: <BROADCAST,MULTICAST,UP,LOWER_UP> mtu 1500 xdpgeneric qdisc mq state UP mode DORMANT group default qlen 1000
link/ether be:08:4d:b6:85:65 brd ff:ff:ff:ff:ff:ff
prog/xdp id 4 tag 57cd311f2e27366b <-- BPF program ID 4
[...]
# bpftool prog dump xlated id 4 <-- Dump of instructions running on em1
0: (b7) r0 = 1
1: (95) exit
# ip link set dev em1 xdpgeneric off


XDP Related Config
==================
CONFIG_CGROUP_BPF=y
CONFIG_BPF=y
CONFIG_BPF_SYSCALL=y
CONFIG_NET_SCH_INGRESS=m
CONFIG_NET_CLS_BPF=m
CONFIG_NET_CLS_ACT=y
CONFIG_BPF_JIT=y
CONFIG_LWTUNNEL_BPF=y
CONFIG_HAVE_EBPF_JIT=y
CONFIG_BPF_EVENTS=y
CONFIG_TEST_BPF=m
CONFIG_XDP_SOCKETS=y

$ cd tools/testing/selftests/bpf/
$ make
$ sudo ./test_verifier


Sample COde to drop IP Traffic from 50.50.50.1

#include "../../include/uapi/linux/bpf.h"

#include "../../include/uapi/linux/if_ether.h"

#include "../../include/uapi/linux/if_packet.h"

#include "../../include/uapi/linux/ip.h"

#include "../../include/uapi/linux/in.h"

#include "../../include/uapi/linux/tcp.h"

#include "../../include/uapi/linux/udp.h"

//#include "bpf_helpers.h"

#ifndef __section

# define __section(NAME)                  \

           __attribute__((section(NAME), used))

#endif__section("prog")

         //https://www.vultr.com/resources/ipv4-converter/?ip_address=50.50.50.1

         //842150401

int xdp_drop(struct xdp_md *ctx)

{

        void *data_end = (void *)(long)ctx->data_end;

        void *data     = (void *)(long)ctx->data;

        struct ethhdr *eth = data;        if (eth + 1 > data_end) {

                return XDP_PASS;

        }        struct iphdr *iph = data + sizeof(struct ethhdr);        if (iph + 1 > data_end) {

                return XDP_PASS;

        }

        unsigned int ip_src = iph->saddr;

        //printf("%ld\n",htonl(842150401));  network byte order conversion for

        //50.50.50.1

        if(ip_src == 20066866)

        {

                return XDP_DROP;

        }        return XDP_PASS;

}


Good Links

https://docs.cilium.io/en/latest/bpf/

https://medium.com/@fntlnz/load-xdp-programs-using-the-ip-iproute2-command-502043898263
https://qmonnet.github.io/whirl-offload/2016/09/01/dive-into-bpf


Tuesday, May 26, 2020

Memory Usage of Kernel Driver Module in Linux

Memory Usage of Kernel Driver Module in Linux

A nice tool memstrack .

kthread.c ( example for memory allocation of 50mb)

#include
#include
#include
#include
#include
#include


static int thread_init(void){

    char *buffer;
    int i =0;
    for(i=0;i<50 br="" i="">    {
        buffer = (char *)kmalloc(1000*1000, GFP_KERNEL);
    }
    if(buffer == NULL)
        printk(KERN_ERR "low memory...");
    else
        printk(KERN_ERR "Allocation succedded...\n");
    return 0;
}

void thread_exit(void){
        printk(KERN_INFO "done.");
}

2. run 

./memstrack --report module_summary,proc_slab_static --notui -o mem.txt

3. cat mem.txt

======== Report format module_summary: ========
Module kthread using 50.0MB (12800 pages), peak allocation 50.0MB (12800 pages)
Module xfs using 0.1MB (31 pages), peak allocation 0.1MB (31 pages)
Module tg3 using 0.1MB (16 pages), peak allocation 0.1MB (16 pages)
Module sr_mod using 0.0MB (1 pages), peak allocation 0.0MB (1 pages)
Module cdrom using 0.0MB (0 pages), peak allocation 0.0MB (0 pages)
======== Report format module_summary END ========

you can cleary see 50mb tracked by the tool.

Saturday, May 16, 2020

Forcing Packet to go through Wire using Two Ports of Same Card or 2 NIC on Single HOST Linux Machine

Forcing Packet to go through Wire using Two Ports of Same Card or 2 NIC on Single HOST Linux Machine


Src
https://wiki.psuter.ch/doku.php?id=force_local_traffic_through_external_ethernet_cable_by_using_ip_namespaces
https://serverfault.com/questions/127636/force-local-ip-traffic-to-an-external-interface


We have one interface which is called as loopback interface (lo). When we ping or send traffic to test local
interface it is the loopback interface which replies.

Lets say we have three interfaces on Linux PC eth1, eth2 and lo (loopback interface).
so whatver br the ip of eth1 and eth2. you can always ping them and packet will not actually go over wire.

To Force packet over wire we use either of approach
1.Iptables modification
2.Netns

This blog will use netns as it much clearner methid.

Normally in OS there is only one instance of Network stack and related sets of Table ( Arp , routing table etc).
With Namespace you logically have seperate have copy of All of Above.


ip netns add ns_server
ip netns add ns_client


ip link set ens1f0 netns ns_server
ip netns exec ns_server ip addr add dev ens1f0 192.168.1.1/24
ip netns exec ns_server ip link set dev ens1f0 up

ip link set ens1f1 netns ns_client
ip netns exec ns_client ip addr add dev ens1f1 192.168.1.2/24
ip netns exec ns_client ip link set dev ens1f1 up


ip netns exec ns_server iperf -s -B 192.168.1.1
ip netns exec ns_client iperf -c 192.168.1.1 -B 192.168.1.2


ethtool shows actual hardware stats ( dont rely on ifconfig/ip command output they are from kernel stats)

root@hp-p70:/home/fastlinq# ip netns exec ns_server ethtool -S ens1f0 | grep rcv
           rcv_pkts: 187171024
root@hp-p70:/home/fastlinq# ip netns exec ns_server ethtool -S ens1f0 | grep xmit
           xmit_pkts: 98899174

Featured Post

XDP - Getting Started with XDP (Linux)